В ефірі Андрій Романенко. Я ІТ
Архітектор та Інструктор. Моя основна спеціалізація і сфера професійних
інтересів – Це Віртуалізація, Хмарні технології, Інфраструктура як Код і усе,
що корелює із цією тематикою.
Цей Блог – спроба систематизації,
узагальнення і оцифровки усього, що накопичилось у вигляді паперових
щоденників, електронних заміток, документів, так і просто раптово прийдешніх
думок за останні років так 20-ть. Деякі замітки будуть датовані тим часовим
відрізком, коли були написані.
Буду радий, якщо кожен відвідувач знайде
тут для себе щось корисне.
С повагою, Андрій.
P.S. Перелік навчальних курсів, котрі я проводжу знаходяться на сторінці Навчання. Контактну інформацію можна глянути на сторінці Про Мене.
Привіт усім читачам блогу про ІТ Архітектуру і Навчання.
Продовжуємо публікацію статей під концептуальною назвою “Архітектура і Дизайн. Впровадження і Експлуатація. Код і Програмування”.
У минулому матеріалі мова йшла про відображення схеми архітектури системи Microsoft System Center Virtual Machine Manager 2007 у форматі Visio для відповідної серії статей. Ми виконали цю роботу за допомогою коду Powershell. Результат повністю задовільнив наші очікування. Проте, основним суттєвим недоліком є об’єм коду і відсутність стратегії повторного його використання. За допомогою функцій можна організувати блоки коду для повторного використання і скоротити його загальний об’єм.
Саме цьому і буде присвячений цей допис.
Функції Powershell
Реалізація роботи функцій Powershell потребує розміщення цього коду у файлі і відповідного синтаксису команд та ініціалізації цих елементів. Отож, створимо новий файл PSVisio.ps1 у котрому будуть розміщені усі наші напрацювання.
Для того, щоб виконати ініціалізацію коду написаних нами функцій Powershell слід буде виконати таку команду:
. .\PSVisio.ps1
При внесенні змін у код, слід буде вивантажити змінену функцію командою:
rm Function:\NameOfFunction
І знову виконати ініціалізацію командою, що була описана вище.
На початку нашого написання коду і наповнення функціями файл PSVisio.ps1 буде містити заголовок у вигляді коментарів і початкову ініціалізацію декількох змінних. Вони будуть використані у формуванні імені об’єкта шляхом послідовної нумерації:
Як бачимо, він починається із операторів створення Об’єкту застосунку Visio. Оформимо ці нескладні кроки у вигляді першої функції – New-VisioApplication.
Функція Set-VisioPage також нескладна. ЇЇ логіка у встановленні Активної сторінки, котра буде основою нашої майбутньої схеми. Функція також не має вхідних параметрів.
Function Set-VisioPage {

#######################################################################
#
# Powershell function for Set Active Visio Document Page
#
# Version:        0.1
# Author:         Andrii Romanenko
# Website:        blogs.airra.net
# Creation Date:  14.09.2007
# Purpose/Change: Initial script development
#
# Run:
#
# Set-VisioPage
#
#######################################################################

# Set Visio Active Page
$Script:Page=$Script:Application.ActivePage
$Script:Application.ActivePage.PageSheet
}
Add-VisioStensil
У Visio фігури базуються на основі трафаретів. Тому завдання наступної функції Add-VisioStensil додати трафарети фігур із відповідного файлу .vss. Функція отримує два параметри на вхід: Name – імя для об’єкту трафарета, і File – назва файлу трафаретів.
Для роботи із конкретною фігурою слід вказати, що буде головним зразком фігури. Логіку цієї операції ми оформимо у вигляді функції Set-VisioStensilMasterItem. Функція має два вхідних параметри: Stensil – назва обєкту трафарета і Item – назва фігури.
Ось ми і підійшли безпосередньо до функцій, котрі будуть виконувати дії зі створення і відображення об’єктів із заданими характеристиками. Для початку це будуть прості геометричні фігури, – прямокутник, коло, лінія, тощо.
Знову Нагадаємо собі фрагмент коду, що виконує ці дії.
Функція Draw-VisioItem має три обов’язкових параметри: Master – Назву зразка фігури, і координати розташування X та Y. Решта параметрів, такі як: FillForegnd – колір забарвлення фігури, LinePattern – стиль лінії контуру фігури, Text – Текст фігури, VerticalAlign і ParaHorzAlign – парметри вирівнювання тексту по вертикалі і горизонталі, CharSize і CharColor – розмір і колір символів надпису є необовязковими.
Функція Draw-VisioLine розроблена для малювання різноманітних ліній. Вона має кілька обовязкових параметри: координати початку BeginX, BeginY, і закінчення EndX, EndY. Також можуть бути вказані необовязкові параметри: LineColor – колір лінії і стиль стрілок BeginArrow, EndArrow.
Function Draw-VisioLine ($BeginX, $BeginY, $EndX, $EndY, $LineWeight, $LineColor, $BeginArrow, $EndArrow) {

#######################################################################
#
# Powershell function for Draw Visio Line
#
# Version:        0.1
# Author:         Andrii Romanenko
# Website:        blogs.airra.net
# Creation Date:  15.09.2007
# Purpose/Change: Initial script development
#
# Version:        0.2
# Author:         Andrii Romanenko
# Website:        blogs.airra.net
# Creation Date:  17.09.2007
# Purpose/Change: Add Flow Control Input Parameters
#
# Run:
#
# Draw-VisioLine -BeginX 0.3125 -BeginY 10.3438 -EndX 12.4948 -EndY 10.3438 -LineWeight "1 pt"`
# -LineColor "RGB(255,255,255)" -BeginArrow 4 -EndArrow 4
#
#######################################################################

$Script:Line++

# Set Expression And Draw Line
$Expression = '$Script:Line' + $Script:Line + ' = $Script:Page.DrawLine(' + $BeginX + ',' + $BeginY + ',' + $EndX + ',' + $EndY + ')'
Invoke-Expression $Expression

# Set Line Width Properties
If ($LineWeight)
	{
		$Expression = '$Script:Line' + $Script:Line + '.Cells("LineWeight").Formula = "' + $LineWeight + '"'
		Invoke-Expression $Expression
	}

# Set Line Color Properties
$Expression = '$Script:Line' + $Script:Line + '.Cells("LineColor").Formula = "=' +  $LineColor + '"'
Invoke-Expression $Expression

# Set Line Begin Arrow Properties
If ($BeginArrow)
	{
		$Expression = '$Script:Line' + $Script:Line + '.Cells("BeginArrow").Formula = ' + $BeginArrow
		Invoke-Expression $Expression
	}

# Set Line End Arrow Properties
If ($EndArrow)
	{
		$Expression = '$Script:Line' + $Script:Line + '.Cells("EndArrow").Formula = ' + $EndArrow
		Invoke-Expression $Expression
	}
}
Draw-VisioIcon
Функція Draw-VisioIcon дасть можливість додавати до схем попередньо підготовлені піктограми у форматі .png чи .jpeg. Вона має кілька обовязкових параметрів: IconPath – шлях і назва файлу піктограми, розміри Width, Height і координати PinX, PinY. Необовязковими параметрами є текст надпису Text і його розмір символів CharSize.
Функція Resize-VisioPageToFitContents надзвичайно проста, її завдання виконати зміну розмірів сторінки до розмірів малюнку. Вхідних параметрів вона не має.
Function Resize-VisioPageToFitContents {

#######################################################################
#
# Powershell function for Resize Active Visio Document Page to Fit Contents
#
# Version:        0.1
# Author:         Andrii Romanenko
# Website:        blogs.airra.net
# Creation Date:  17.09.2007
# Purpose/Change: Initial script development
#
# Run:
#
# Resize-VisioPageToFitContents
#
#######################################################################

# Resize Page to Fit Contents
$Script:Page.ResizeToFitContents()
}
Save-VisioDocument
Залишаються дрібні фінальні кроки. Логіка функції Save-VisioDocument виконати збереження сформованої діаграми у вигляді файлу Visio .vsd. Функція має обовязковий параметер File – назва файлу Visio .vsd.
Function Save-VisioDocument ($File) {

#######################################################################
#
# Powershell function for save Visio Document
#
# Version:        0.1
# Author:         Andrii Romanenko
# Website:        blogs.airra.net
# Creation Date:  17.09.2007
# Purpose/Change: Initial script development
#
# Run:
#
# Save-VisioDocument -File 'C:\!\MsSCVMM2007Arch.vsd'
#
#######################################################################

# Save Document
$Expression = '$Script:Document.SaveAs("' + $File + '")'
Invoke-Expression $Expression
}
Close-VisioApplication
Завершує цю сюжетну лінію функція Close-VisioApplication. Вона не має параметрів, іі логіка лише у закритті додатку Visio.
Function Close-VisioApplication {

#######################################################################
#
# Powershell function for create Visio Application
#
# Version:        0.1
# Author:         Andrii Romanenko
# Website:        blogs.airra.net
# Creation Date:  17.09.2007
# Purpose/Change: Initial script development
#
# Run:
#
# Close-VisioApplication
#
#######################################################################

# Close Visio Application
$Script:Application.Quit()
}
PSVisio.ps1
Фінальний результат коду коду функцій у файлі PSVisio.ps1 виглядає так:
Поточна версія вищезазначеного коду знаходиться в репозиторії Git за цим посиланням: PSVisio.ps1.
MsSCVMM2k7ArchDiagramV1.ps1
Відповідно код формування діаграми архітектури системи Microsoft System Center Virtual Machine Manager 2007 у форматі Visio:
. .\PSVisio.ps1

# Step 1.
# Create Visio Application
# Create Document from Blank Template
# Set Active Page
New-VisioApplication
New-VisioDocument
Set-VisioPage

# Step 2.
# Add Basic Visio Stensils
# Set Masters Item Rectangle
Add-VisioStensil -Name "Basic" -File "BASIC_M.vss"
Set-VisioStensilMasterItem -Stensil Basic -Item "Rectangle"

# Step 3.
# Draw Main Rectangle, Set Size, Set Colour
# Set Text, Size, Color, Align
# Draw Line, Set Weight, Color
Draw-VisioItem -Master "Rectangle" -X 6.375 -Y 7.125 -Width 12.2501 -Height 7.25 -FillForegnd "RGB(0,153,204)"`
 -LinePattern 0 -Text "Microsoft Virtual Machine Manager Architecture" -VerticalAlign '0' -ParaHorzAlign '0'`
 -CharSize "20 pt" -CharColor "RGB(255,255,255)"
Draw-VisioLine -BeginX 0.3125 -BeginY 10.3438 -EndX 12.4948 -EndY 10.3438 -LineWeight "1 pt" -LineColor "RGB(255,255,255)"

# Step 4.
# Draw Client Rectangle, Set Size, Set Colour
# Set Text, Align
# Draw Line
Draw-VisioItem -Master "Rectangle" -X 1.7656 -Y 9.2344 -Width 2.7813 -Height 1.9688 -FillForegnd "RGB(209,235,241)"`
 -LinePattern 1 -Text "Client" -VerticalAlign '0' -ParaHorzAlign '1'`
 -CharSize "14 pt" -CharColor "RGB(0,0,0)"
Draw-VisioLine -BeginX 0.4297 -BeginY 9.9427 -EndX 3.0833 -EndY 9.9427 -LineWeight "0.5 pt" -LineColor "RGB(0,0,0)"

# Step 5.
# Add Computer Items Visio Stensils
# Set Masters item PC
Add-VisioStensil -Name "Computer" -File "COMPS_M.vss"
Set-VisioStensilMasterItem -Stensil "Computer" -Item "PC"

# Step 6.
# Draw item PC
# Set Text, Size
Draw-VisioItem -Master "PC" -X 1.1173 -Y 9.1693 -Text "Administrator Console" -CharSize "10 pt"

# Step 7.
# Draw Powershell Icon
# Set Position, Size
# Set Text
Draw-VisioIcon -IconPath "c:\!\powershell.png" -Width 0.9843 -Height 0.9843 -PinX 2.5547 -PinY 9.2682 `
 -Text "Windows Powershell" -CharSize "10 pt"

# Step 8.
# Draw WCF Rectangle, Set Size, Set Colour
# Set Text, Align
# Draw Line
Draw-VisioItem -Master "Rectangle" -X 4.2682 -Y 6.9063 -Width 1.5 -Height 6.625 -FillForegnd "RGB(255,255,255)"`
 -LinePattern 1 -Text "Windows Communication Foundation" -VerticalAlign '0'`
 -CharSize "14 pt"
Draw-VisioLine -BeginX 3.5664 -BeginY 9.4063 -EndX 4.9492 -EndY 9.4063 -LineWeight "0.5 pt" -LineColor "RGB(0,0,0)"

# Step 9.----
# Draw WCF Icon
# Set Position, Size
Draw-VisioIcon -IconPath "c:\!\WCF.png" -Width 1.412 -Height 1.0443 -PinX 4.2708 -PinY 6.9779

# Step 10.
# Draw Line communication from Client to WCF
# Set Arrow
Draw-VisioLine -BeginX 3.1563 -BeginY 9.2396 -EndX 3.5174 -EndY 9.2396 -LineColor "RGB(255,255,255)" -BeginArrow 4 -EndArrow 4

# Step 11.
# Draw Web Client Rectangle, Set Size, Set Colour
# Set Text, Align
# Draw Line
Draw-VisioItem -Master "Rectangle" -X 1.7656 -Y 6.8776 -Width 2.7813 -Height 2.1094 -FillForegnd "RGB(209,235,241)"`
 -LinePattern 1 -Text "Web Client" -VerticalAlign '0'`
 -CharSize "14 pt"
Draw-VisioLine -BeginX 0.4297 -BeginY 7.6562 -EndX 3.0833 -EndY 7.6562 -LineWeight "0.5 pt" -LineColor "RGB(0,0,0)"

# Step 12.
# Draw Self Service Portal Icon
# Set Position, Size
# Set Text
Draw-VisioIcon -IconPath "c:\!\SelfServicePortal.png" -Width 0.8438 -Height 0.8438 -PinX 1.1094 -PinY 6.9271 `
 -Text "Self Service Portal" -CharSize "10 pt"

# Step 13.
# Draw Powershell Icon
# Set Position, Size
# Set Text
Draw-VisioIcon -IconPath "c:\!\powershell.png" -Width 0.9843 -Height 0.9843 -PinX 2.4922 -PinY 6.9192 `
 -Text "Windows Powershell" -CharSize "10 pt"

# Step 14.
# Draw Line communication from Web Client to WCF
# Set Arrow
Draw-VisioLine -BeginX 3.158 -BeginY 6.8802 -EndX 3.5191 -EndY 6.8802 -LineColor "RGB(255,255,255)" -BeginArrow 4 -EndArrow 4

# Step 15.
# Draw Scripting Client Rectangle, Set Size, Set Colour
# Set Text, Align
# Draw Line
Draw-VisioItem -Master "Rectangle" -X 1.7657 -Y 4.5469 -Width 2.7813 -Height 1.9062 -FillForegnd "RGB(209,235,241)"`
 -LinePattern 1 -Text "Scripting Client" -VerticalAlign '0'`
 -CharSize "14 pt"
Draw-VisioLine -BeginX 0.4297 -BeginY 5.1979 -EndX 3.0834 -EndY 5.1979 -LineWeight "0.5 pt" -LineColor "RGB(0,0,0)"

# Step 16.
# Draw Powershell Icon
# Set Position, Size
# Set Text
Draw-VisioIcon -IconPath "c:\!\powershell.png" -Width 0.9843 -Height 0.9843 -PinX 1.7631 -PinY 4.6015 `
 -Text "Windows Powershell" -CharSize "10 pt"

# Step 17.
# Draw Line communication from Scripting Client to WCF
# Set Arrow
Draw-VisioLine -BeginX 3.158 -BeginY 4.5729 -EndX 3.5191 -EndY 4.5729 -LineColor "RGB(255,255,255)" -BeginArrow 4 -EndArrow 4

# Step 18.
# Draw Microsoft System Center
# Virtual Machine Manager Server 2007 Rectangle
# Set Size, Set Colour
# Set Text, Align
Draw-VisioItem -Master "Rectangle" -X 6.3281 -Y 8.2812 -Width 1.5 -Height 2.8125 -FillForegnd "RGB(255,192,0)"`
 -LinePattern 1 -Text "Microsoft System Center Virtual Machine Manager Server 2007" -CharSize "14 pt"

# Step 19.
# Draw Microsoft SQL Server 2005 Rectangle
# Set Size, Set Colour
# Set Text, Align
Draw-VisioItem -Master "Rectangle" -X 6.3281 -Y 4.9219 -Width 1.5 -Height 2.6563 -FillForegnd "RGB(255,192,0)"`
 -LinePattern 1 -Text "Microsoft SQL Server 2005" -CharSize "14 pt"

# Step 20.
# Add Server Items Visio Stensils
# Set Masters item Management Server and Database Server
Add-VisioStensil -Name "Server" -File "SERVER_M.vss"
Set-VisioStensilMasterItem -Stensil "Server" -Item "Management server"
Set-VisioStensilMasterItem -Stensil "Server" -Item "Database server"

# Step 21.
# Draw item Management Server
Draw-VisioItem -Master "Management server" -X 5.6043 -Y 9.7421

# Step 22.
# Draw item Management Server
Draw-VisioItem -Master "Database server" -X 5.5832 -Y 6.3046

# Step 23.
# Draw Line communication from WCF to Microsoft System Center
# Virtual Machine Manager Server 2007
# Set Arrow
Draw-VisioLine -BeginX 5.0052 -BeginY 8.2604 -EndX 5.6024 -EndY 8.2604 -LineColor "RGB(255,255,255)" -BeginArrow 4 -EndArrow 4

# Step 24.
# Draw Line communication from Microsoft System Center
# Virtual Machine Manager Server 2007 to Microsoft SQL Server 2005
# Set Arrow
Draw-VisioLine -BeginX 6.3272 -BeginY 6.2344 -EndX 6.3272 -EndY 6.8802 -LineColor "RGB(255,255,255)" -BeginArrow 4 -EndArrow 0

# Step 25.
# Draw Win-RM Rectangle, Set Size, Set Colour
# Set Text, Align
# Draw Line
Draw-VisioItem -Master "Rectangle" -X 8.4375 -Y 6.9219 -Width 1.5 -Height 6.6563 -FillForegnd "RGB(255,255,255)"`
 -LinePattern 1 -Text "Windows Remote Managemet (Win-RM)" -VerticalAlign '0'`
 -CharSize "14 pt"
Draw-VisioLine -BeginX 7.75 -BeginY 9.1875 -EndX 9.1328 -EndY 9.1875 -LineWeight "0.5 pt" -LineColor "RGB(0,0,0)"

# Step 26.
# Draw Win-RM Icon
# Set Position, Size
Draw-VisioIcon -IconPath "c:\!\Win-RM.png" -Width 1.1563 -Height 1.1563 -PinX 8.4293 -PinY 7

# Step 27.
# Draw Line communication from Win-RM to Microsoft System Center
# Virtual Machine Manager Server 2007
# Set Arrow
Draw-VisioLine -BeginX 7.0781 -BeginY 8.2812 -EndX 7.6753 -EndY 8.2812 -LineColor "RGB(255,255,255)" -BeginArrow 4 -EndArrow 4

# Step 28.
# Draw P2V Source Rectangle, Set Size, Set Colour
# Set Text, Align
# Draw Line
Draw-VisioItem -Master "Rectangle" -X 10.9844 -Y 9.5 -Width 2.7813 -Height 1.5 -FillForegnd "RGB(209,235,241)"`
 -LinePattern 1 -Text "P2V Source" -VerticalAlign '0'`
 -CharSize "14 pt"
Draw-VisioLine -BeginX 9.6485 -BeginY 9.9739 -EndX 12.3021 -EndY 9.9739 -LineWeight "0.5 pt" -LineColor "RGB(0,0,0)"

# Step 29.
# Draw VMM Agent Icon
# Set Position, Size
# Set Text
Draw-VisioIcon -IconPath "c:\!\VMMAgent.png" -Width 0.8438 -Height 0.8438 -PinX 10.2969 -PinY 9.5 `
 -Text "VMM Agent" -CharSize "10 pt"

# Step 30.
# Draw Powershell Icon
# Set Position, Size
# Set Text
Draw-VisioIcon -IconPath "c:\!\powershell.png" -Width 0.7968 -Height 0.7968 -PinX 11.6016 -PinY 9.6016 `
 -Text "Windows Powershell" -CharSize "10 pt"

# Step 31.
# Draw Line communication from P2V Source to Win-RM
# Set Arrow
Draw-VisioLine -BeginX 9.1875 -BeginY 9.487 -EndX 9.599 -EndY 9.487 -LineColor "RGB(255,255,255)" -BeginArrow 4 -EndArrow 4

# Step 32.
# Draw Host Rectangle, Set Size, Set Colour
# Set Text, Align
# Draw Line
Draw-VisioItem -Master "Rectangle" -X 10.9792 -Y 6.9427 -Width 2.7813 -Height 1.5 -FillForegnd "RGB(209,235,241)"`
 -LinePattern 1 -Text "Host" -VerticalAlign '0'`
 -CharSize "14 pt"
Draw-VisioLine -BeginX 9.6472 -BeginY 7.4219 -EndX 12.3008 -EndY 7.4219 -LineWeight "0.5 pt" -LineColor "RGB(0,0,0)"

# Step 33.
# Draw VMM Agent Icon
# Set Position, Size
# Set Text
Draw-VisioIcon -IconPath "c:\!\VMMAgent.png" -Width 0.8438 -Height 0.8438 -PinX 10.2917 -PinY 6.9427 `
 -Text "VMM Agent" -CharSize "10 pt"

# Step 34.
# Draw Microsoft Virtual Server 2005 R2 Icon
# Set Position, Size
# Set Text
Draw-VisioIcon -IconPath "c:\!\WS.jpg" -Width 0.8125 -Height 0.7404 -PinX 11.5938 -PinY 6.9423 `
 -Text "Microsoft Virtual Server 2005 R2" -CharSize "7 pt"

# Step 35.
# Draw Line communication from Host to Win-RM
# Set Arrow
Draw-VisioLine -BeginX 9.1849 -BeginY 6.941 -EndX 9.5964 -EndY 6.941 -LineColor "RGB(255,255,255)" -BeginArrow 4 -EndArrow 4

# Step 36.
# Draw Library Rectangle, Set Size, Set Colour
# Set Text, Align
# Draw Line
Draw-VisioItem -Master "Rectangle" -X 10.9792 -Y 4.3542 -Width 2.7813 -Height 1.5 -FillForegnd "RGB(209,235,241)"`
 -LinePattern 1 -Text "Library" -VerticalAlign '0'`
 -CharSize "14 pt"
Draw-VisioLine -BeginX 9.6419 -BeginY 4.8073 -EndX 12.2955 -EndY 4.8073 -LineWeight "0.5 pt" -LineColor "RGB(0,0,0)"

# Step 37.
# Draw VMM Agent Icon
# Set Position, Size
# Set Text
Draw-VisioIcon -IconPath "c:\!\VMMAgent.png" -Width 0.8438 -Height 0.8438 -PinX 10.2917 -PinY 4.3542 `
 -Text "VMM Agent" -CharSize "10 pt"

# Step 38.
# Draw Windows Server 2003 R2 Icon
# Set Position, Size
# Set Text
Draw-VisioIcon -IconPath "c:\!\WS.jpg" -Width 0.8125 -Height 0.7404 -PinX 11.5625 -PinY 4.3702 `
 -Text "Windows Server 2003 R2" -CharSize "7 pt"

# Step 39.
# Draw Line communication from Library to Win-RM
# Set Arrow
Draw-VisioLine -BeginX 9.1901 -BeginY 4.3611 -EndX 9.6016 -EndY 4.3611 -LineColor "RGB(255,255,255)" -BeginArrow 4 -EndArrow 4

# Step 40.
# Draw BITS Rectangle, Set Size, Set Colour
# Set Text, Align
# Draw Line
Draw-VisioItem -Master "Rectangle" -X 10.9844 -Y 8.2292 -Width 2.75 -Height 0.5625 -FillForegnd "RGB(255,255,0)"`
 -LinePattern 1 -Text "BITS" -ParaHorzAlign '0'`
 -CharSize "14 pt"

# Step 41.
# Draw BITS Icon
# Set Position, Size
# Set Text
Draw-VisioIcon -IconPath "c:\!\BITS.jpg" -Width 0.5417 -Height 0.5417 -PinX 10.974 -PinY 8.2344

# Step 42.
# Draw Line communication from BITS to P2V Source
# Set Arrow
Draw-VisioLine -BeginX 10.9844 -BeginY 8.5104 -EndX 10.9844 -EndY 8.75 -LineColor "RGB(255,255,255)" -BeginArrow 4 -EndArrow 4

# Step 43.
# Draw Line communication from BITS to Host
# Set Arrow
Draw-VisioLine -BeginX 10.9844 -BeginY 7.6849 -EndX 10.9844 -EndY 7.9219 -LineColor "RGB(255,255,255)" -BeginArrow 4 -EndArrow 4

# Step 44.
# Draw BITS Rectangle, Set Size, Set Colour
# Set Text, Align
# Draw Line
Draw-VisioItem -Master "Rectangle" -X 10.9844 -Y 5.6555 -Width 2.75 -Height 0.5625 -FillForegnd "RGB(255,255,0)"`
 -LinePattern 1 -Text "BITS" -ParaHorzAlign '0'`
 -CharSize "14 pt"

# Step 45.
# Draw BITS Icon
# Set Position, Size
# Set Text
Draw-VisioIcon -IconPath "c:\!\BITS.jpg" -Width 0.5417 -Height 0.5417 -PinX 10.974 -PinY 5.6607

# Step 46.
# Draw Line communication from BITS to Host
# Set Arrow
Draw-VisioLine -BeginX 10.9844 -BeginY 5.9245 -EndX 10.9844 -EndY 6.1901 -LineColor "RGB(255,255,255)" -BeginArrow 4 -EndArrow 4

# Step 47.
# Draw Line communication from BITS to Library
# Set Arrow
Draw-VisioLine -BeginX 10.9792 -BeginY 5.1042 -EndX 10.9792 -EndY 5.375 -LineColor "RGB(255,255,255)" -BeginArrow 4 -EndArrow 4

# Step 48.
# Resise Page To Fit Contents
Resize-VisioPageToFitContents

# Step 49.
# Save Document
# And Quit Application
Save-VisioDocument -File 'C:\!\MsSCVMM2007Arch.vsd'
Close-VisioApplication
Поточна версія вищезазначеного коду знаходиться в репозиторії Git за цим посиланням: MsSCVMM2k7ArchDiagramV1.ps1.
Короткий Підсумок.
Отже фінальний результат повністю аналогічний описаному в попередніх публікаціях, проте оптимізація за допомогою функцій дозволила скоротити об’єм коду з 516 рядків до 326. Код став більш оптимальним і читабельним. Позитивним фактором також являється стратегія повторного використання коду.
Проте залишаються ще задачі до реалізації: функції мають мати код перевірки вхідних параметрів на коректність, і додати і розширити алгоритми роботи із більш складними фігурами.
Пройшло три роки з часу придбання Microsoft компанії Connectix. І ось, нарешті Microsoft випускає інструмент управління корпоративного сегменту для Virtual Server: Virtual Machine Manager 2007, що входить до сімейства продуктів System Center.
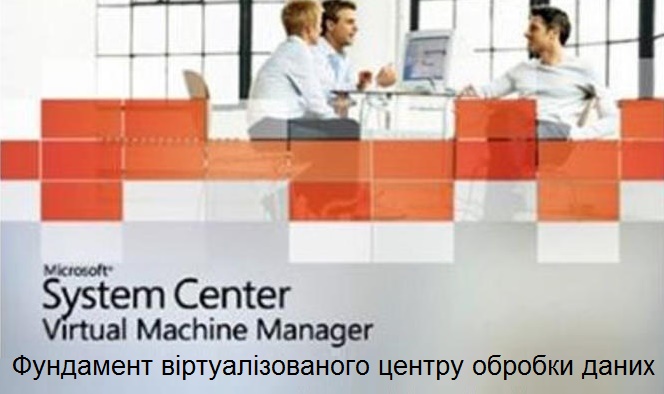
Microsoft System Center Virtual Machine Manager 2007, це комплексне рішення для управління віртуалізованим центром обробки даних, що дозволяє збільшити фізичну утилізацію серверів та забезпечити централізоване управління інфраструктурою віртуальних машин.
Загальні характеристики
Перше видання System Center Virtual Machine Manager містить наступні функції управління віртуальною інфраструктурою:
Підтримка життевого циклу експлуатації віртуальних машин;
Централізована бібліотека еталонних образів віртуальних машин, скриптів та образів ISO;
Швидке та надійне перетворення фізичного сервера у віртуальну машину (P2V міграція);
Швидке та надійне перетворення віртуальної машини у віртуальну машину (V2V міграція);
Надання функціоналу самообслуговування через веб-портал;
Розширені можливості сценаріїв автоматизації завдяки інтеграції з PowerShell;
Інтеграція з System Center Operation Manager 2007 для моніторингу віртуального центру обробки даних та планування потужностей;
Інтеграція з System Center Configuration Manager 2007 для оновлення віртуальних машин в режимі офлайн;
Інтеграція з System Center Manager Data Protection Manager 2007 для резервного копіювання працюючих віртуальних машин.
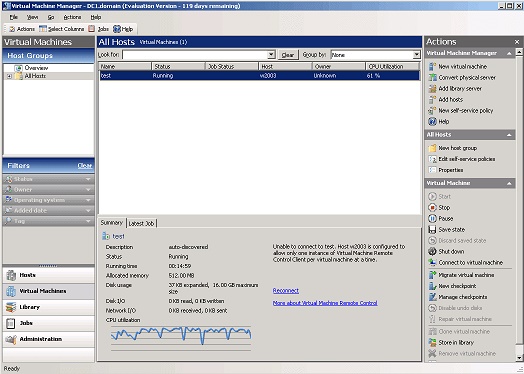
Консоль адміністратора Virtual Machine Manager створена на звичному користувальницькому інтерфейсі Operations Manager 2007, завдяки чому адміністратори швидко та легко зможуть управляти своїми віртуальними машинами. Комплексний моніторинг стану здоров’я хостів, віртуальних машин, серверів бібліотек та компонентів Virtual Machine Manager надається через Virtualization Management Pack в Operations Manager 2007.
System Center Virtual Machine Manager також інтегрований із знайомими інструментами та технологіями. Наприклад, Virtual Machine Manager використовує базу даних SQL Server для зберігання даних про продуктивність та конфігурацію, а можливості звітності в Virtual Machine Manager використовують знайомі технології SQL Reporting Services, котрі, щоправда надаються через System Center Operations Manager.
Короткий Підсумок
Отже, перший випуск Microsoft System Center Virtual Machine Manager 2007 показав себе як повноцінне рішення для управління віртуалізованим середовищем. Інтеграція з іншими продуктами System Center та підтримка PowerShell відкривають широкі можливості для адміністраторів.
Проте основна увага у наступних публікаціях буде приділена саме архітектурі SCVMM — від принципів побудови до оптимальних моделей розгортання в корпоративній інфраструктурі.
Привіт усім читачам блогу про ІТ Архітектуру і Навчання.
Продовжуємо публікацію статей під концептуальною назвою “Архітектура і Дизайн. Впровадження і Експлуатація. Код і Програмування”.
У минулому матеріалі мова йшла про цю концепцію загалом і про створення середовища і налаштування інструментів для розробки коду.
Сьогодні ми почнемо написання коду для відображення схеми архітектури системи Microsoft System Center Virtual Machine Manager 2007 у форматі Visio для відповідної серії статей.
Microsoft Visio і Powershel. Перші кроки
Отже почнемо із простих кроків.
Створимо обєкт застосунку Visio і новий документ на основі пустого шаблону. Встановимо активну сторінку, на котрій в подальшому будемо програмно малювати нашу архітектурну схему.
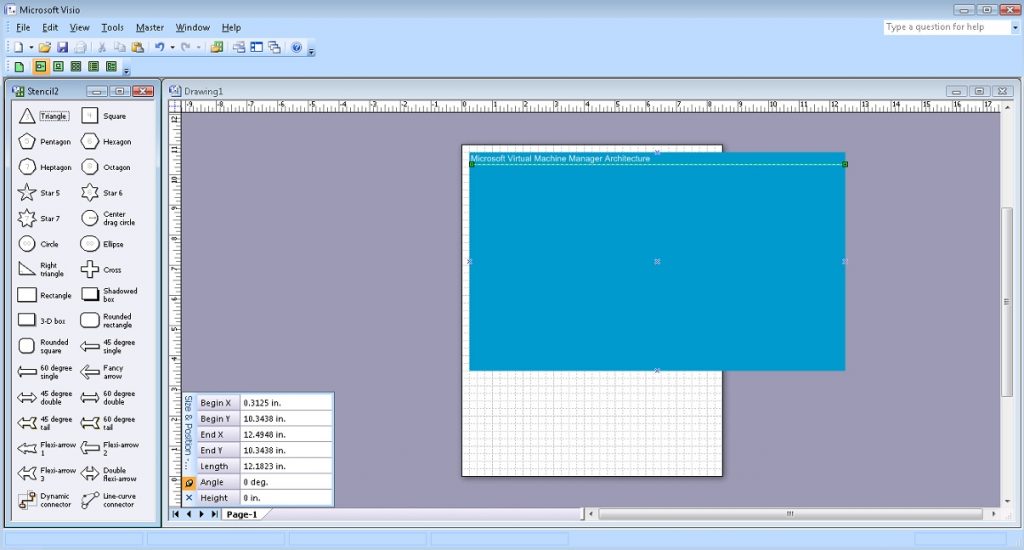
Малюємо прямокутник із забарвленням, і надписом “Microsoft Virtual Machine Manager Architecture”. Текст вирівнюємо по верхньому краю прямокутника і зліва. Ця фігура буде основою нашої схеми. Для естетичного підкреслення надпису намалюємо під ним лінію відповідного кольору.
В межах цього прямокутника буде кілька обєктів. Додаємо трафарети фігур компьютерної тематики (COMPS_M.vss), і будемо працювати із шаблоном піктограми Персонального компьютера “PC”.
# Step 5.
# Add Computer Items Visio Stensils
# Set Masters item PC
$Stensil2 = $Application.Documents.Add("COMPS_M.vss")
$PC1 = $Stensil2.Masters.Item("PC")
Додаємо зображення Персонального Компьютера із Підписом “Administrator Console”.
З’єднуємо два об’єкти лінією – Клієнтську Систему із програмним інтерфейсом Windows Communication Foundation. Це буде відображати двосторонню комунікацію.
# Step 10.
# Draw Line communication from Client to WCF
# Set Arrow
$Line4 = $Page.DrawLine(3.1563, 9.2396, 3.5174, 9.2396)
$Line4.Cells('LineColor').Formula = '=RGB(255,255,255)'
$Line4.Cells('BeginArrow').Formula=4
$Line4.Cells('EndArrow').Formula=4
Додаємо прямокутник, що буде відображати веб клієнта.
Аналогічно знову з’єднуємо два обєкти лінією – Веб Клієнта із програмним інтерфейсом Windows Communication Foundation. Це також буде відображати двосторонню комунікацію.
# Step 14.
# Draw Line communication from Web Client to WCF
# Set Arrow
$Line6 = $Page.DrawLine(3.158, 6.8802, 3.5191, 6.8802)
$Line6.Cells('LineColor').Formula = '=RGB(255,255,255)'
$Line6.Cells('BeginArrow').Formula=4
$Line6.Cells('EndArrow').Formula=4
І завершує клієнтську картину прямокутник, що відображає Scripting Client із ще одною піктограмою PowerShell. І звичайно ж, зєднуємо цей об’єкт із програмним інтерфейсом Windows Communication Foundation двосторонньою комунікацією.
# Step 17.
# Draw Line communication from Scripting Client to WCF
# Set Arrow
$Line8 = $Page.DrawLine(3.158, 4.5729, 3.5191, 4.5729)
$Line8.Cells('LineColor').Formula = '=RGB(255,255,255)'
$Line8.Cells('BeginArrow').Formula=4
$Line8.Cells('EndArrow').Formula=4
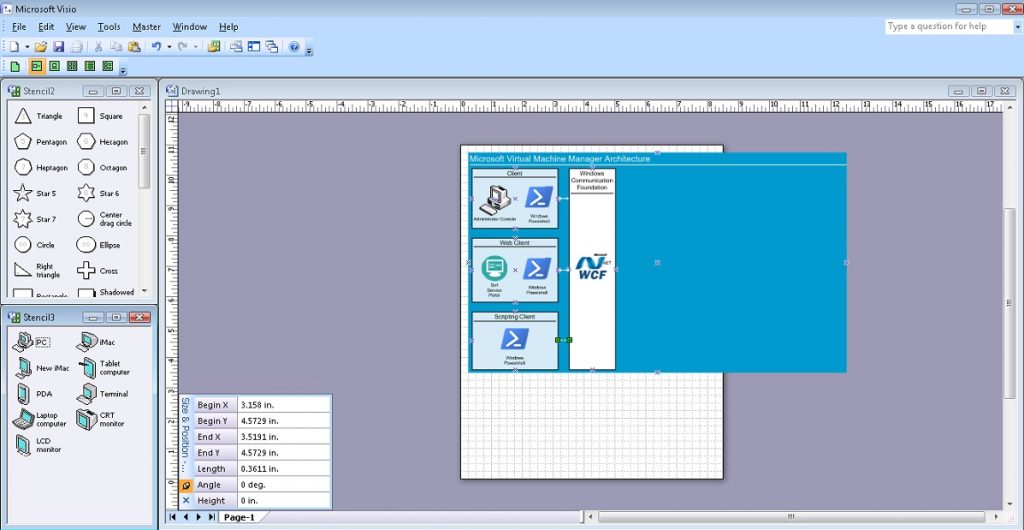
Результат виконання попередніх кроків виглядає так:
Малюнок 2. Проміжний результат виконання попередніх фрагментів Powershell Коду.
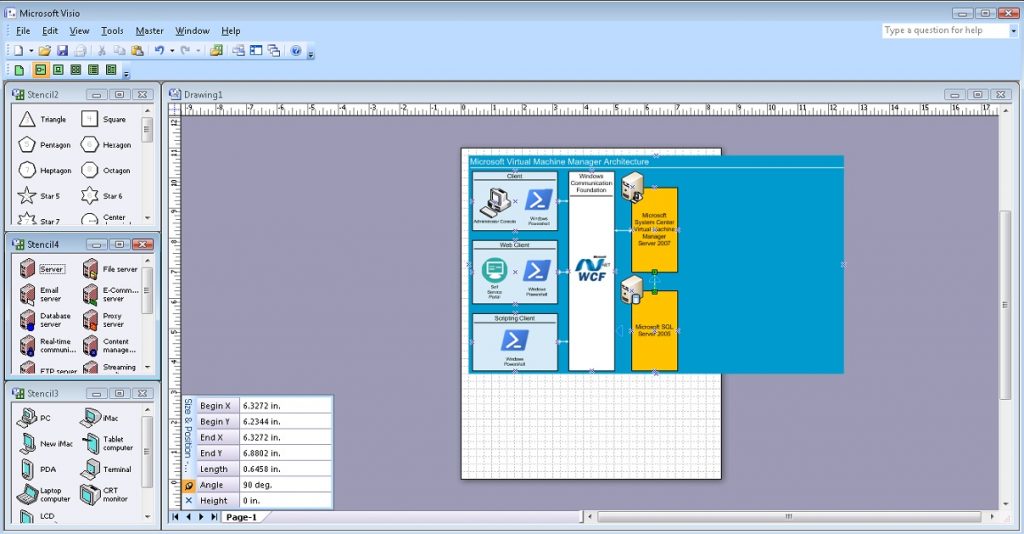
Тепер перейдемо до основних сервісів. Для візуалізації роботи серверної частини використаємо трафарети фігур відповідної тематики (SERVER_M.vss), і будемо працювати із шаблонами піктограм Сервера управління “Management server” і Сервера бази даних “Database server”. Спершу малюємо прямокутник для візуалізації Microsoft System Center Virtual Machine Manager Server 2007 і відповідно інший для Microsoft SQL Server 2005. Відповідні Піктограми серверів розташовуємо поверх прямокутників зліва вверху. І звичайно ж з’єднуємо обєкт “Microsoft System Center Virtual Machine Manager Server 2007” із програмним інтерфейсом Windows Communication Foundation двосторонньою комунікацією, а із Microsoft SQL Server 2005 односторонньою.
# Step 18.
# Draw Microsoft System Center
# Virtual Machine Manager Server 2007 Rectangle
# Set Size, Set Colour
# Set Text, Align
$Shape7 = $Page.Drop($Rectangle, 6.3281, 8.2812)
$Shape7.Cells('Width').Formula = '1.5'
$Shape7.Cells('Height').Formula = '2.8125'
$Shape7.Cells('FillForegnd').Formula = '=RGB(255,192,0)'
$Shape7.Cells('LinePattern').Formula = 1
$Shape7.Text = "Microsoft System Center Virtual Machine Manager Server 2007"
$Shape7.Cells('Char.Size').Formula = '14 pt'
# Step 19.
# Draw Microsoft SQL Server 2005 Rectangle
# Set Size, Set Colour
# Set Text, Align
$Shape8 = $Page.Drop($Rectangle, 6.3281, 4.9219)
$Shape8.Cells('Width').Formula = '1.5'
$Shape8.Cells('Height').Formula = '2.6563'
$Shape8.Cells('FillForegnd').Formula = '=RGB(255,192,0)'
$Shape8.Cells('LinePattern').Formula = 1
$Shape8.Text = "Microsoft SQL Server 2005"
$Shape8.Cells('Char.Size').Formula = '14 pt'
# Step 20.
# Add Server Items Visio Stensils
# Set Masters item Management Server and Database Server
$Stensil3 = $Application.Documents.Add("SERVER_M.vss")
$MS1 = $Stensil3.Masters.Item("Management server")
$DBS1 = $Stensil3.Masters.Item("Database server")
# Step 23.
# Draw Line communication from WCF to Microsoft System Center
# Virtual Machine Manager Server 2007
# Set Arrow
$Line9 = $Page.DrawLine(5.0052, 8.2604, 5.6024, 8.2604)
$Line9.Cells('LineColor').Formula = '=RGB(255,255,255)'
$Line9.Cells('BeginArrow').Formula=4
$Line9.Cells('EndArrow').Formula=4
# Step 24.
# Draw Line communication from Microsoft System Center
# Virtual Machine Manager Server 2007 to Microsoft SQL Server 2005
# Set Arrow
$Line10 = $Page.DrawLine(6.3272, 6.2344, 6.3272, 6.8802)
$Line10.Cells('LineColor').Formula = '=RGB(255,255,255)'
$Line10.Cells('BeginArrow').Formula=4
$Line10.Cells('EndArrow').Formula=0
Результат виконання попередніх кроків виглядає так:
Малюнок 3. Проміжний результат виконання попередніх фрагментів Powershell Коду.
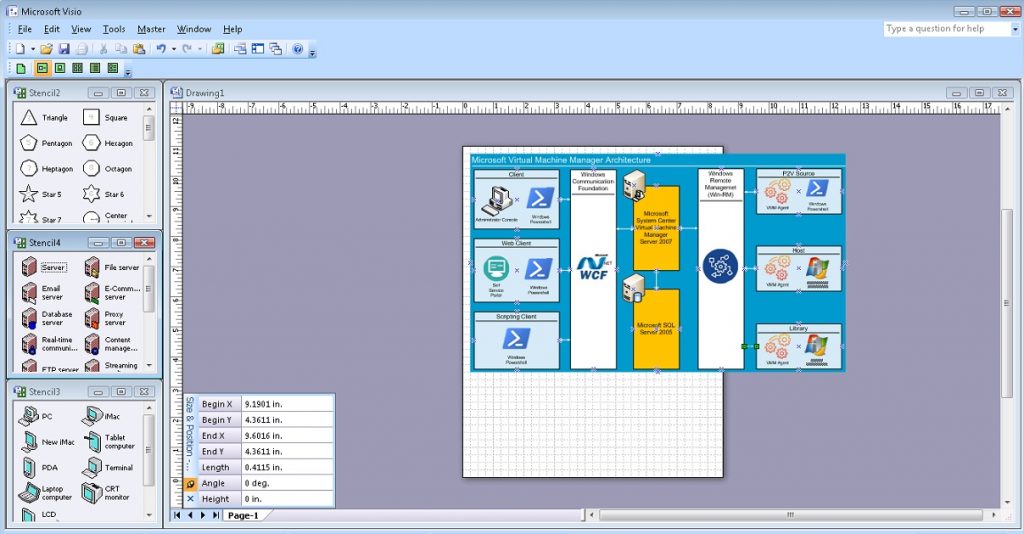
Взаємодію Microsoft System Center Virtual Machine Manager Server 2007 із агентськими системами забезпечує технологія Windows Remote Management (Win-RM). Отож намалюємо цей компонент архітектури аналогічно тому, як малювали відображення програмного інтерфейсу Windows Communication Foundation. І з’єднаємо цей компонент із об’єктом Microsoft System Center Virtual Machine Manager Server 2007 двосторонньою комунікацією.
# Step 27.
# Draw Line communication from Win-RM to Microsoft System Center
# Virtual Machine Manager Server 2007
# Set Arrow
$Line12 = $Page.DrawLine(7.0781, 8.2812, 7.6753, 8.2812)
$Line12.Cells('LineColor').Formula = '=RGB(255,255,255)'
$Line12.Cells('BeginArrow').Formula=4
$Line12.Cells('EndArrow').Formula=4
Взаємодія із хостами віртуалізації, Бібліотекою, тощо базуються на основі VMM Агента. Почнемо відображати ці компоненти архітектури з візуалізації взаємодії процесів міграції сервісів з фізичного середовища у віртуальне: P2V Source. Нам буде потрібен прямокутник, лінія, піктограми VMM Агента і Powershell. І звичайно ж відображенння двосторонньої комунікації із технологією Windows Remote Managemet (Win-RM).
# Step 34.
# Draw Microsoft Virtual Server 2005 R2 Icon
# Set Position, Size
# Set Text
$Picture10 = $Page.Import("c:\!\WS.jpg")
$Picture10.Cells('Width').Formula = '0.8125'
$Picture10.Cells('Height').Formula = '0.7404'
$Picture10.Cells('PinX').Formula = '11.5938'
$Picture10.Cells('PinY').Formula = '6.9423'
$Picture10.Text = "Microsoft Virtual Server 2005 R2"
$Picture10.Cells('Char.Size').Formula = '7 pt'
# Step 35.
# Draw Line communication from Host to Win-RM
# Set Arrow
$Line16 = $Page.DrawLine(9.1849, 6.941, 9.5964, 6.941)
$Line16.Cells('LineColor').Formula = '=RGB(255,255,255)'
$Line16.Cells('BeginArrow').Formula=4
$Line16.Cells('EndArrow').Formula=4
І подібно до попередніх кроків, відображаємо елементи Бібліотеки.
# Step 38.
# Draw Windows Server 2003 R2 Icon
# Set Position, Size
# Set Text
$Picture12 = $Page.Import("c:\!\WS.jpg")
$Picture12.Cells('Width').Formula = '0.8125'
$Picture12.Cells('Height').Formula = '0.7404'
$Picture12.Cells('PinX').Formula = '11.5625'
$Picture12.Cells('PinY').Formula = '4.3702'
$Picture12.Text = "Windows Server 2003 R2"
$Picture12.Cells('Char.Size').Formula = '7 pt'
# Step 39.
# Draw Line communication from Library to Win-RM
# Set Arrow
$Line18 = $Page.DrawLine(9.1901, 4.3611, 9.6016, 4.3611)
$Line18.Cells('LineColor').Formula = '=RGB(255,255,255)'
$Line18.Cells('BeginArrow').Formula=4
$Line18.Cells('EndArrow').Formula=4
Результат виконання попередніх кроків виглядає так:
Малюнок 4. Проміжний результат виконання попередніх фрагментів Powershell Коду.
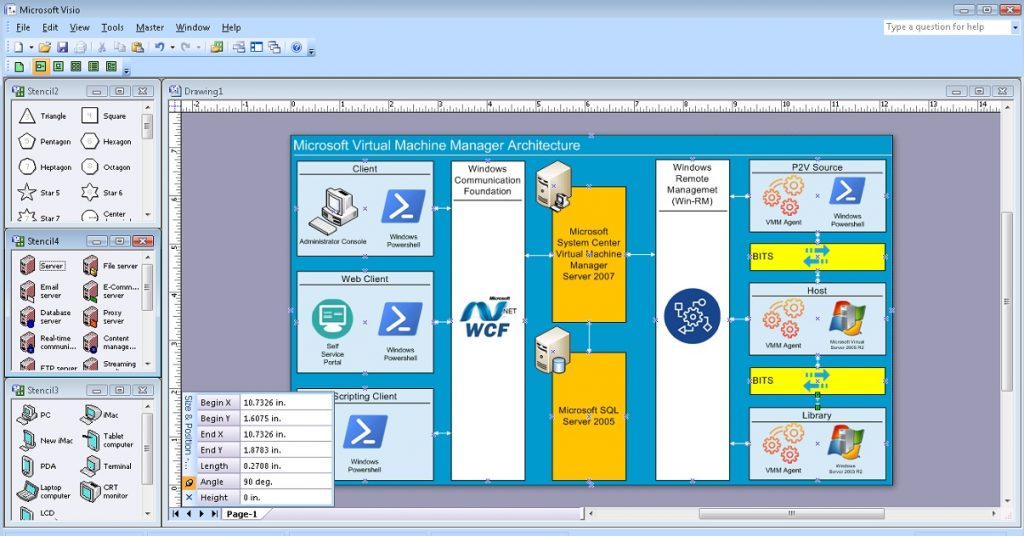
Взаємодія між Хостами віртуалізації, Бібліотекою і процесами міграції сервісів з фізичного середовища у віртуальне: P2V Source здійснюється за допомогою технології Background Intelligent Transfer Service (BITS). Відобразимо цю двосторонню взаємодію між кінцевими елементами архітектури.
# Step 41.
# Draw BITS Icon
# Set Position, Size
# Set Text
$Picture13 = $Page.Import("c:\!\BITS.jpg")
$Picture13.Cells('Width').Formula = '0.5417'
$Picture13.Cells('Height').Formula = '0.5417'
$Picture13.Cells('PinX').Formula = '10.974'
$Picture13.Cells('PinY').Formula = '8.2344'
# Step 42.
# Draw Line communication from BITS to P2V Source
# Set Arrow
$Line19 = $Page.DrawLine(10.9844, 8.5104, 10.9844, 8.75)
$Line19.Cells('LineColor').Formula = '=RGB(255,255,255)'
$Line19.Cells('BeginArrow').Formula=4
$Line19.Cells('EndArrow').Formula=4
# Step 43.
# Draw Line communication from BITS to Host
# Set Arrow
$Line20 = $Page.DrawLine(10.9844, 7.6849, 10.9844, 7.9219)
$Line20.Cells('LineColor').Formula = '=RGB(255,255,255)'
$Line20.Cells('BeginArrow').Formula=4
$Line20.Cells('EndArrow').Formula=4
# Step 45.
# Draw BITS Icon
# Set Position, Size
# Set Text
$Picture14 = $Page.Import("c:\!\BITS.jpg")
$Picture14.Cells('Width').Formula = '0.5417'
$Picture14.Cells('Height').Formula = '0.5417'
$Picture14.Cells('PinX').Formula = '10.974'
$Picture14.Cells('PinY').Formula = '5.6607'
# Step 46.
# Draw Line communication from BITS to Host
# Set Arrow
$Line21 = $Page.DrawLine(10.9844, 5.9245, 10.9844, 6.1901)
$Line21.Cells('LineColor').Formula = '=RGB(255,255,255)'
$Line21.Cells('BeginArrow').Formula=4
$Line21.Cells('EndArrow').Formula=4
# Step 47.
# Draw Line communication from BITS to Library
# Set Arrow
$Line22 = $Page.DrawLine(10.9792, 5.1042, 10.9792, 5.375)
$Line22.Cells('LineColor').Formula = '=RGB(255,255,255)'
$Line22.Cells('BeginArrow').Formula=4
$Line22.Cells('EndArrow').Formula=4
І наостанок виконаємо зміну розміру сторінки згідно розмірів нашої діаграми, збережемо її у вигляді файлу на диску і здійснимо закриття додатку Visio.
# Step 48.
# Resise Page To Fit Contents
$Page.ResizeToFitContents()
# Step 49.
# Save Document
# And Quit Application
$Document.SaveAs(“C:\!\MsSCVMM2007Arch.vsd”)
$Application.Quit()
Кінцевий результат схеми показаний на малюнку.
Малюнок 5. Фінальний результат виконання Powershell Коду.
Поточна версія вищезазначеного коду знаходиться в репозиторії Git за цим посиланням: VisioPowershellv01.ps1.
Короткий Підсумок і Наступні кроки
Отже фінальний результат повністю задовільняє наші очікування. За допомогою Powershell Коду була створена схема архітектури системи Microsoft System Center Virtual Machine Manager 2007.
Проте даний підхід має суттєві недоліки.
Загальний об’єм цього коду нараховує понад 500 рядків. Тому тема наступної публікації це оптимізація цього коду за допомогою функцій Powershell.