
Вступ
Привіт усім читачам блогу про ІТ Архітектуру і Навчання.
Продовжуємо публікацію статей під концептуальною назвою “Архітектура і Дизайн. Впровадження і Експлуатація. Код і Програмування”.
У минулому матеріалі мова йшла про цю концепцію загалом і про створення середовища і налаштування інструментів для розробки коду.
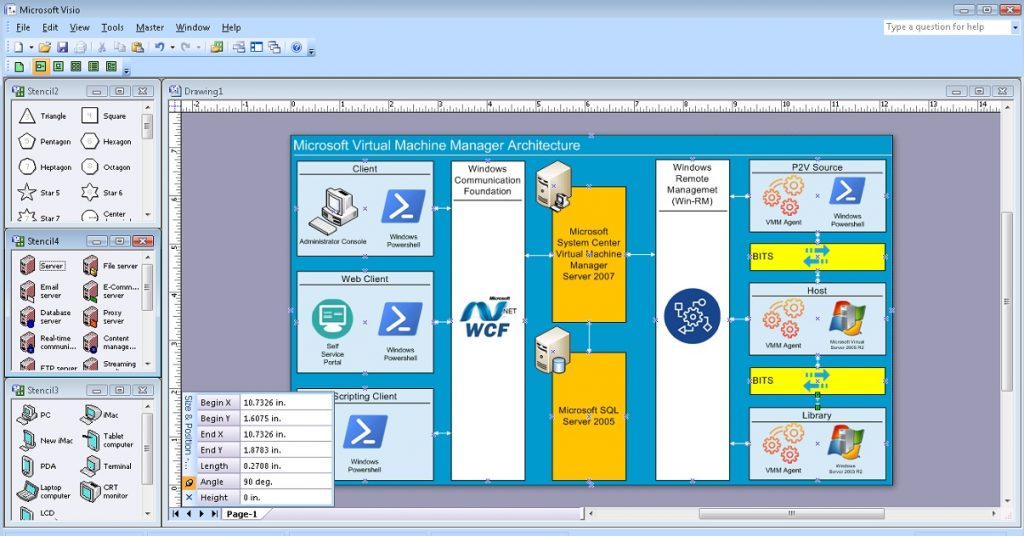
Сьогодні ми почнемо написання коду для відображення схеми архітектури системи Microsoft System Center Virtual Machine Manager 2007 у форматі Visio для відповідної серії статей.
Microsoft Visio і Powershel. Перші кроки
Отже почнемо із простих кроків.
Створимо обєкт застосунку Visio і новий документ на основі пустого шаблону. Встановимо активну сторінку, на котрій в подальшому будемо програмно малювати нашу архітектурну схему.
# Step 1.
# Create Visio Object
# Create Document from Blank Template
# Set Active Page
$Application = New-Object -ComObject Visio.Application
$Application.Visible = $True
$Documents = $Application.Documents
$Document=$Application.Documents.Add('')
$Page=$Application.ActivePage
$Application.ActivePage.PageSheet
Додаємо трафарети базових фігур (BASIC_M.vss). Спершу нам буде потрібен шаблон прямокутника.
# Step 2.
# Add Basic Visio Stensils
# Set Masters Item Rectangle
$Stensil1 = $Application.Documents.Add("BASIC_M.vss")
$Rectangle = $Stensil1.Masters.Item("Rectangle")
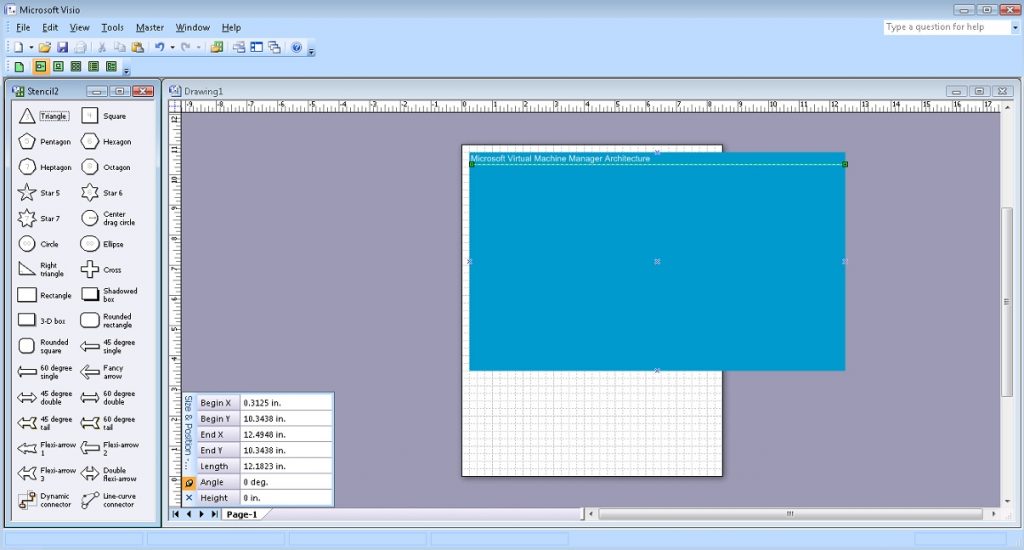
Малюємо прямокутник із забарвленням, і надписом “Microsoft Virtual Machine Manager Architecture”. Текст вирівнюємо по верхньому краю прямокутника і зліва. Ця фігура буде основою нашої схеми. Для естетичного підкреслення надпису намалюємо під ним лінію відповідного кольору.
# Step 3.
# Draw Main Rectangle, Set Size, Set Colour
# Set Text, Size, Color, Align
# Draw Line, Set Weight, Color
$Shape1 = $Page.Drop($Rectangle, 6.375, 7.125)
$Shape1.Cells('Width').Formula = '12.2501'
$Shape1.Cells('Height').Formula = '7.25'
$Shape1.Cells('FillForegnd').Formula = '=RGB(0,153,204)'
$Shape1.Cells('LinePattern').Formula = 0
$Shape1.Text = "Microsoft Virtual Machine Manager Architecture"
$Shape1.Cells('VerticalAlign') = 0
$Shape1.Cells('Para.HorzAlign') = 0
$Shape1.Cells('Char.Size').Formula = '20 pt'
$Shape1.Cells('Char.Color').Formula = '=RGB(255,255,255)'
$Line1 = $Page.DrawLine(0.3125, 10.3438, 12.4948, 10.3438)
$Line1.Cells('LineWeight').Formula = '1 pt'
$Line1.Cells('LineColor').Formula = '=RGB(255,255,255)'
Проміжний результат виконання попередніх кроків виглядає так:
Аналогічно, малюємо прямокутник, що буде відображати клієнтську систему.
# Step 4.
# Draw Client Rectangle, Set Size, Set Colour
# Set Text, Align
# Draw Line
$Shape2 = $Page.Drop($Rectangle, 1.7656, 9.2344)
$Shape2.Cells('Width').Formula = '2.7813'
$Shape2.Cells('Height').Formula = '1.9688'
$Shape2.Cells('FillForegnd').Formula = '=RGB(209,235,241)'
$Shape2.Cells('LinePattern').Formula = 1
$Shape2.Text = "Client"
$Shape2.Cells('VerticalAlign') = 0
$Shape2.Cells('Char.Size').Formula = '14 pt'
$Line2 = $Page.DrawLine(0.4297, 9.9427, 3.0833, 9.9427)
$Line2.Cells('LineWeight').Formula = '0.5 pt'
$Line2.Cells('LineColor').Formula = '=RGB(0,0,0)'
В межах цього прямокутника буде кілька обєктів. Додаємо трафарети фігур компьютерної тематики (COMPS_M.vss), і будемо працювати із шаблоном піктограми Персонального компьютера “PC”.
# Step 5.
# Add Computer Items Visio Stensils
# Set Masters item PC
$Stensil2 = $Application.Documents.Add("COMPS_M.vss")
$PC1 = $Stensil2.Masters.Item("PC")
Додаємо зображення Персонального Компьютера із Підписом “Administrator Console”.
# Step 6.
# Draw item PC
# Set Text, Size
$Shape3 = $Page.Drop($PC1, 1.1173, 9.1693)
$Shape3.Text = "Administrator Console"
$Shape3.Cells('Char.Size').Formula = '10 pt'
Додаємо піктограмму PowerShell. В цьому випадку будемо використовувати підготовлений зазделегідь малюнок у форматі PNG (PowerShell.png).
# Step 7.
# Draw Powershell Icon
# Set Position, Size
# Set Text
$Picture1 = $Page.Import("c:\!\powershell.png")
$Picture1.Cells('Width').Formula = '0.9843'
$Picture1.Cells('Height').Formula = '0.9843'
$Picture1.Cells('PinX').Formula = '2.5547'
$Picture1.Cells('PinY').Formula = '9.2682'
$Picture1.Text = "Windows Powershell"
$Picture1.Cells('Char.Size').Formula = '10 pt'
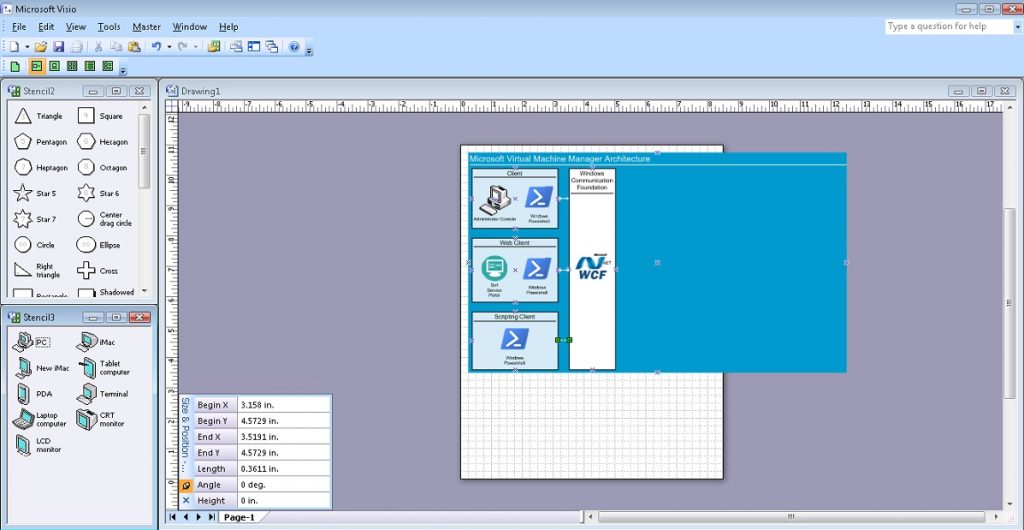
Малюємо прямокутник, котрий буде відображати програмний інтерфейс комунікації клієнтських систем із серверними – Windows Communication Foundation.
# Step 8.
# Draw WCF Rectangle, Set Size, Set Colour
# Set Text, Align
# Draw Line
$Shape4 = $Page.Drop($Rectangle, 4.2682, 6.9063)
$Shape4.Cells('Width').Formula = '1.5'
$Shape4.Cells('Height').Formula = '6.625'
$Shape4.Cells('FillForegnd').Formula = '=RGB(255,255,255)'
$Shape4.Cells('LinePattern').Formula = 1
$Shape4.Text = "Windows Communication Foundation"
$Shape4.Cells('VerticalAlign') = 0
$Shape4.Cells('Char.Size').Formula = '14 pt'
$Line3 = $Page.DrawLine(3.5664, 9.4063, 4.9492, 9.4063)
$Line3.Cells('LineWeight').Formula = '0.5 pt'
$Line3.Cells('LineColor').Formula = '=RGB(0,0,0)'
Додаємо пікторамму WCF.
# Step 9.
# Draw WCF Icon
# Set Position, Size
$Picture2 = $Page.Import("c:\!\WCF.png")
$Picture2.Cells('Width').Formula = '1.412'
$Picture2.Cells('Height').Formula = '1.0443'
$Picture2.Cells('PinX').Formula = '4.2708'
$Picture2.Cells('PinY').Formula = '6.9779'
З’єднуємо два об’єкти лінією – Клієнтську Систему із програмним інтерфейсом Windows Communication Foundation. Це буде відображати двосторонню комунікацію.
# Step 10.
# Draw Line communication from Client to WCF
# Set Arrow
$Line4 = $Page.DrawLine(3.1563, 9.2396, 3.5174, 9.2396)
$Line4.Cells('LineColor').Formula = '=RGB(255,255,255)'
$Line4.Cells('BeginArrow').Formula=4
$Line4.Cells('EndArrow').Formula=4
Додаємо прямокутник, що буде відображати веб клієнта.
# Step 11.
# Draw Web Client Rectangle, Set Size, Set Colour
# Set Text, Align
# Draw Line
$Shape5 = $Page.Drop($Rectangle, 1.7656, 6.8776)
$Shape5.Cells('Width').Formula = '2.7813'
$Shape5.Cells('Height').Formula = '2.1094'
$Shape5.Cells('FillForegnd').Formula = '=RGB(209,235,241)'
$Shape5.Cells('LinePattern').Formula = 1
$Shape5.Text = "Web Client"
$Shape5.Cells('VerticalAlign') = 0
$Shape5.Cells('Char.Size').Formula = '14 pt'
$Line5 = $Page.DrawLine(0.4297, 7.6562, 3.0833, 7.6562)
$Line5.Cells('LineWeight').Formula = '0.5 pt'
$Line5.Cells('LineColor').Formula = '=RGB(0,0,0)'
Аналогічно попереднім крокам додаємо піктограмму Веб порталу Самообслуговування (SelfServicePortal.png) і ще одну піктограмму PowerShell.
# Step 12.
# Draw Self Service Portal Icon
# Set Position, Size
# Set Text
$Picture3 = $Page.Import("c:\!\SelfServicePortal.png")
$Picture3.Cells('Width').Formula = '0.8438'
$Picture3.Cells('Height').Formula = '0.8438'
$Picture3.Cells('PinX').Formula = '1.1094'
$Picture3.Cells('PinY').Formula = '6.9271'
$Picture3.Text = "Self Service Portal"
$Picture3.Cells('Char.Size').Formula = '10 pt'
# Step 13.
# Draw Powershell Icon
# Set Position, Size
# Set Text
$Picture4 = $Page.Import("c:\!\powershell.png")
$Picture4.Cells('Width').Formula = '0.9843'
$Picture4.Cells('Height').Formula = '0.9843'
$Picture4.Cells('PinX').Formula = '2.4922'
$Picture4.Cells('PinY').Formula = '6.9192'
$Picture4.Text = "Windows Powershell"
$Picture4.Cells('Char.Size').Formula = '10 pt'Аналогічно знову з’єднуємо два обєкти лінією – Веб Клієнта із програмним інтерфейсом Windows Communication Foundation. Це також буде відображати двосторонню комунікацію.
# Step 14.
# Draw Line communication from Web Client to WCF
# Set Arrow
$Line6 = $Page.DrawLine(3.158, 6.8802, 3.5191, 6.8802)
$Line6.Cells('LineColor').Formula = '=RGB(255,255,255)'
$Line6.Cells('BeginArrow').Formula=4
$Line6.Cells('EndArrow').Formula=4
І завершує клієнтську картину прямокутник, що відображає Scripting Client із ще одною піктограмою PowerShell. І звичайно ж, зєднуємо цей об’єкт із програмним інтерфейсом Windows Communication Foundation двосторонньою комунікацією.
# Step 15.
# Draw Scripting Client Rectangle, Set Size, Set Colour
# Set Text, Align
# Draw Line
$Shape6 = $Page.Drop($Rectangle, 1.7657, 4.5469)
$Shape6.Cells('Width').Formula = '2.7813'
$Shape6.Cells('Height').Formula = '1.9062'
$Shape6.Cells('FillForegnd').Formula = '=RGB(209,235,241)'
$Shape6.Cells('LinePattern').Formula = 1
$Shape6.Text = "Scripting Client"
$Shape6.Cells('VerticalAlign') = 0
$Shape6.Cells('Char.Size').Formula = '14 pt'
$Line7 = $Page.DrawLine(0.4297, 5.1979, 3.0834, 5.1979)
$Line7.Cells('LineWeight').Formula = '0.5 pt'
$Line7.Cells('LineColor').Formula = '=RGB(0,0,0)'
# Step 16.
# Draw Powershell Icon
# Set Position, Size
# Set Text
$Picture5 = $Page.Import("c:\!\powershell.png")
$Picture5.Cells('Width').Formula = '0.9843'
$Picture5.Cells('Height').Formula = '0.9843'
$Picture5.Cells('PinX').Formula = '1.7631'
$Picture5.Cells('PinY').Formula = '4.6015'
$Picture5.Text = "Windows Powershell"
$Picture5.Cells('Char.Size').Formula = '10 pt'# Step 17.
# Draw Line communication from Scripting Client to WCF
# Set Arrow
$Line8 = $Page.DrawLine(3.158, 4.5729, 3.5191, 4.5729)
$Line8.Cells('LineColor').Formula = '=RGB(255,255,255)'
$Line8.Cells('BeginArrow').Formula=4
$Line8.Cells('EndArrow').Formula=4Результат виконання попередніх кроків виглядає так:
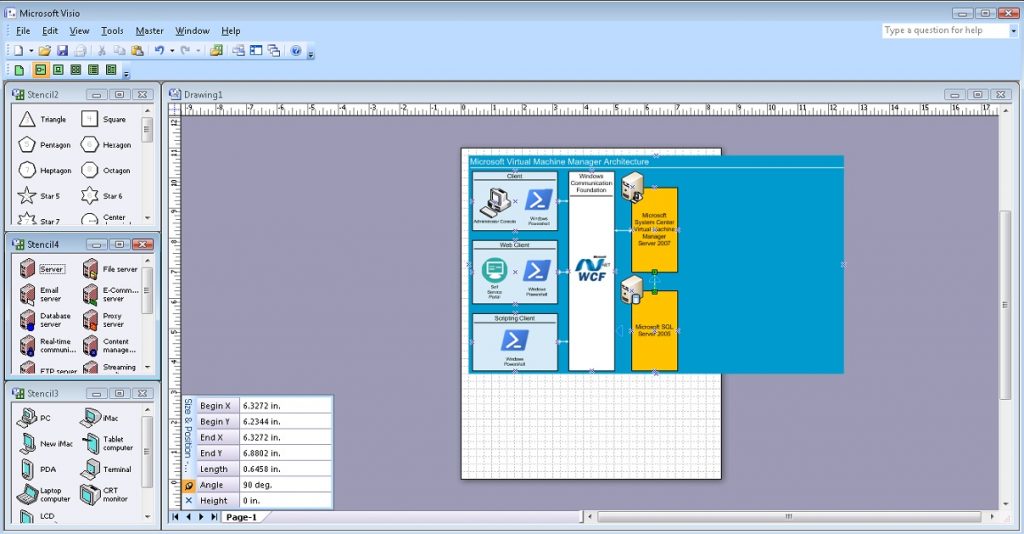
Тепер перейдемо до основних сервісів. Для візуалізації роботи серверної частини використаємо трафарети фігур відповідної тематики (SERVER_M.vss), і будемо працювати із шаблонами піктограм Сервера управління “Management server” і Сервера бази даних “Database server”. Спершу малюємо прямокутник для візуалізації Microsoft System Center Virtual Machine Manager Server 2007 і відповідно інший для Microsoft SQL Server 2005. Відповідні Піктограми серверів розташовуємо поверх прямокутників зліва вверху. І звичайно ж з’єднуємо обєкт “Microsoft System Center Virtual Machine Manager Server 2007” із програмним інтерфейсом Windows Communication Foundation двосторонньою комунікацією, а із Microsoft SQL Server 2005 односторонньою.
# Step 18.
# Draw Microsoft System Center
# Virtual Machine Manager Server 2007 Rectangle
# Set Size, Set Colour
# Set Text, Align
$Shape7 = $Page.Drop($Rectangle, 6.3281, 8.2812)
$Shape7.Cells('Width').Formula = '1.5'
$Shape7.Cells('Height').Formula = '2.8125'
$Shape7.Cells('FillForegnd').Formula = '=RGB(255,192,0)'
$Shape7.Cells('LinePattern').Formula = 1
$Shape7.Text = "Microsoft System Center Virtual Machine Manager Server 2007"
$Shape7.Cells('Char.Size').Formula = '14 pt'
# Step 19.
# Draw Microsoft SQL Server 2005 Rectangle
# Set Size, Set Colour
# Set Text, Align
$Shape8 = $Page.Drop($Rectangle, 6.3281, 4.9219)
$Shape8.Cells('Width').Formula = '1.5'
$Shape8.Cells('Height').Formula = '2.6563'
$Shape8.Cells('FillForegnd').Formula = '=RGB(255,192,0)'
$Shape8.Cells('LinePattern').Formula = 1
$Shape8.Text = "Microsoft SQL Server 2005"
$Shape8.Cells('Char.Size').Formula = '14 pt'# Step 20.
# Add Server Items Visio Stensils
# Set Masters item Management Server and Database Server
$Stensil3 = $Application.Documents.Add("SERVER_M.vss")
$MS1 = $Stensil3.Masters.Item("Management server")
$DBS1 = $Stensil3.Masters.Item("Database server")# Step 21.
# Draw item Management Server
$Shape9 = $Page.Drop($MS1, 5.6043, 9.7421)# Step 22.
# Draw item Management Server
$Shape10 = $Page.Drop($DBS1, 5.5832, 6.3046)# Step 23.
# Draw Line communication from WCF to Microsoft System Center
# Virtual Machine Manager Server 2007
# Set Arrow
$Line9 = $Page.DrawLine(5.0052, 8.2604, 5.6024, 8.2604)
$Line9.Cells('LineColor').Formula = '=RGB(255,255,255)'
$Line9.Cells('BeginArrow').Formula=4
$Line9.Cells('EndArrow').Formula=4# Step 24.
# Draw Line communication from Microsoft System Center
# Virtual Machine Manager Server 2007 to Microsoft SQL Server 2005
# Set Arrow
$Line10 = $Page.DrawLine(6.3272, 6.2344, 6.3272, 6.8802)
$Line10.Cells('LineColor').Formula = '=RGB(255,255,255)'
$Line10.Cells('BeginArrow').Formula=4
$Line10.Cells('EndArrow').Formula=0Результат виконання попередніх кроків виглядає так:
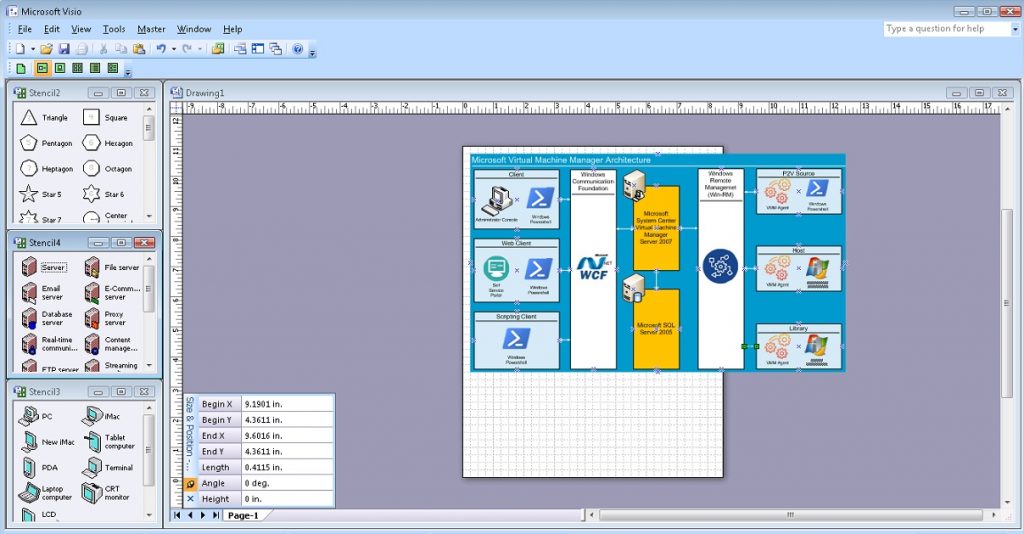
Взаємодію Microsoft System Center Virtual Machine Manager Server 2007 із агентськими системами забезпечує технологія Windows Remote Management (Win-RM). Отож намалюємо цей компонент архітектури аналогічно тому, як малювали відображення програмного інтерфейсу Windows Communication Foundation. І з’єднаємо цей компонент із об’єктом Microsoft System Center Virtual Machine Manager Server 2007 двосторонньою комунікацією.
# Step 25.
# Draw Win-RM Rectangle, Set Size, Set Colour
# Set Text, Align
# Draw Line
$Shape11 = $Page.Drop($Rectangle, 8.4375, 6.9219)
$Shape11.Cells('Width').Formula = '1.5'
$Shape11.Cells('Height').Formula = '6.6563'
$Shape11.Cells('FillForegnd').Formula = '=RGB(255,255,255)'
$Shape11.Cells('LinePattern').Formula = 1
$Shape11.Text = "Windows Remote Managemet (Win-RM)"
$Shape11.Cells('VerticalAlign') = 0
$Shape11.Cells('Char.Size').Formula = '14 pt'
$Line11 = $Page.DrawLine(7.75, 9.1875, 9.1328, 9.1875)
$Line11.Cells('LineWeight').Formula = '0.5 pt'
$Line11.Cells('LineColor').Formula = '=RGB(0,0,0)'
# Step 26.
# Draw Win-RM Icon
# Set Position, Size
$Picture6 = $Page.Import("c:\!\Win-RM.png")
$Picture6.Cells('Width').Formula = '1.1563'
$Picture6.Cells('Height').Formula = '1.1563'
$Picture6.Cells('PinX').Formula = '8.4293'
$Picture6.Cells('PinY').Formula = '7'# Step 27.
# Draw Line communication from Win-RM to Microsoft System Center
# Virtual Machine Manager Server 2007
# Set Arrow
$Line12 = $Page.DrawLine(7.0781, 8.2812, 7.6753, 8.2812)
$Line12.Cells('LineColor').Formula = '=RGB(255,255,255)'
$Line12.Cells('BeginArrow').Formula=4
$Line12.Cells('EndArrow').Formula=4Взаємодія із хостами віртуалізації, Бібліотекою, тощо базуються на основі VMM Агента. Почнемо відображати ці компоненти архітектури з візуалізації взаємодії процесів міграції сервісів з фізичного середовища у віртуальне: P2V Source. Нам буде потрібен прямокутник, лінія, піктограми VMM Агента і Powershell. І звичайно ж відображенння двосторонньої комунікації із технологією Windows Remote Managemet (Win-RM).
# Step 28.
# Draw P2V Source Rectangle, Set Size, Set Colour
# Set Text, Align
# Draw Line
$Shape12 = $Page.Drop($Rectangle, 10.9844, 9.5)
$Shape12.Cells('Width').Formula = '2.7813'
$Shape12.Cells('Height').Formula = '1.5'
$Shape12.Cells('FillForegnd').Formula = '=RGB(209,235,241)'
$Shape12.Cells('LinePattern').Formula = 1
$Shape12.Text = "P2V Source"
$Shape12.Cells('VerticalAlign') = 0
$Shape12.Cells('Char.Size').Formula = '14 pt'
$Line13 = $Page.DrawLine(9.6485, 9.9739, 12.3021, 9.9739)
$Line13.Cells('LineWeight').Formula = '0.5 pt'
$Line13.Cells('LineColor').Formula = '=RGB(0,0,0)'
# Step 29.
# Draw VMM Agent Icon
# Set Position, Size
# Set Text
$Picture7 = $Page.Import("c:\!\VMMAgent.png")
$Picture7.Cells('Width').Formula = '0.8438'
$Picture7.Cells('Height').Formula = '0.8438'
$Picture7.Cells('PinX').Formula = '10.2969'
$Picture7.Cells('PinY').Formula = '9.5'
$Picture7.Text = "VMM Agent"
$Picture7.Cells('Char.Size').Formula = '10 pt'# Step 30.
# Draw Powershell Icon
# Set Position, Size
# Set Text
$Picture8 = $Page.Import("c:\!\powershell.png")
$Picture8.Cells('Width').Formula = '0.7968'
$Picture8.Cells('Height').Formula = '0.7968'
$Picture8.Cells('PinX').Formula = '11.6016'
$Picture8.Cells('PinY').Formula = '9.6016'
$Picture8.Text = "Windows Powershell"
$Picture8.Cells('Char.Size').Formula = '10 pt'# Step 31.
# Draw Line communication from P2V Source to Win-RM
# Set Arrow
$Line14 = $Page.DrawLine(9.1875, 9.487, 9.599, 9.487)
$Line14.Cells('LineColor').Formula = '=RGB(255,255,255)'
$Line14.Cells('BeginArrow').Formula=4
$Line14.Cells('EndArrow').Formula=4Аналогічно, відображаємо Хости віртуалізації – Microsoft Virtual Server 2005 R2.
# Step 32.
# Draw Host Rectangle, Set Size, Set Colour
# Set Text, Align
# Draw Line
$Shape13 = $Page.Drop($Rectangle, 10.9792, 6.9427)
$Shape13.Cells('Width').Formula = '2.7813'
$Shape13.Cells('Height').Formula = '1.5'
$Shape13.Cells('FillForegnd').Formula = '=RGB(209,235,241)'
$Shape13.Cells('LinePattern').Formula = 1
$Shape13.Text = "Host"
$Shape13.Cells('VerticalAlign') = 0
$Shape13.Cells('Char.Size').Formula = '14 pt'
$Line15 = $Page.DrawLine(9.6472, 7.4219, 12.3008, 7.4219)
$Line15.Cells('LineWeight').Formula = '0.5 pt'
$Line15.Cells('LineColor').Formula = '=RGB(0,0,0)'
# Step 33.
# Draw VMM Agent Icon
# Set Position, Size
# Set Text
$Picture9 = $Page.Import("c:\!\VMMAgent.png")
$Picture9.Cells('Width').Formula = '0.8438'
$Picture9.Cells('Height').Formula = '0.8438'
$Picture9.Cells('PinX').Formula = '10.2917'
$Picture9.Cells('PinY').Formula = '6.9427'
$Picture9.Text = "VMM Agent"
$Picture9.Cells('Char.Size').Formula = '10 pt'# Step 34.
# Draw Microsoft Virtual Server 2005 R2 Icon
# Set Position, Size
# Set Text
$Picture10 = $Page.Import("c:\!\WS.jpg")
$Picture10.Cells('Width').Formula = '0.8125'
$Picture10.Cells('Height').Formula = '0.7404'
$Picture10.Cells('PinX').Formula = '11.5938'
$Picture10.Cells('PinY').Formula = '6.9423'
$Picture10.Text = "Microsoft Virtual Server 2005 R2"
$Picture10.Cells('Char.Size').Formula = '7 pt'# Step 35.
# Draw Line communication from Host to Win-RM
# Set Arrow
$Line16 = $Page.DrawLine(9.1849, 6.941, 9.5964, 6.941)
$Line16.Cells('LineColor').Formula = '=RGB(255,255,255)'
$Line16.Cells('BeginArrow').Formula=4
$Line16.Cells('EndArrow').Formula=4І подібно до попередніх кроків, відображаємо елементи Бібліотеки.
# Step 36.
# Draw Library Rectangle, Set Size, Set Colour
# Set Text, Align
# Draw Line
$Shape14 = $Page.Drop($Rectangle, 10.9792, 4.3542)
$Shape14.Cells('Width').Formula = '2.7813'
$Shape14.Cells('Height').Formula = '1.5'
$Shape14.Cells('FillForegnd').Formula = '=RGB(209,235,241)'
$Shape14.Cells('LinePattern').Formula = 1
$Shape14.Text = "Library"
$Shape14.Cells('VerticalAlign') = 0
$Shape14.Cells('Char.Size').Formula = '14 pt'
$Line17 = $Page.DrawLine(9.6419, 4.8073, 12.2955, 4.8073)
$Line17.Cells('LineWeight').Formula = '0.5 pt'
$Line17.Cells('LineColor').Formula = '=RGB(0,0,0)'
# Step 37.
# Draw VMM Agent Icon
# Set Position, Size
# Set Text
$Picture11 = $Page.Import("c:\!\VMMAgent.png")
$Picture11.Cells('Width').Formula = '0.8438'
$Picture11.Cells('Height').Formula = '0.8438'
$Picture11.Cells('PinX').Formula = '10.2917'
$Picture11.Cells('PinY').Formula = '4.3542'
$Picture11.Text = "VMM Agent"
$Picture11.Cells('Char.Size').Formula = '10 pt'# Step 38.
# Draw Windows Server 2003 R2 Icon
# Set Position, Size
# Set Text
$Picture12 = $Page.Import("c:\!\WS.jpg")
$Picture12.Cells('Width').Formula = '0.8125'
$Picture12.Cells('Height').Formula = '0.7404'
$Picture12.Cells('PinX').Formula = '11.5625'
$Picture12.Cells('PinY').Formula = '4.3702'
$Picture12.Text = "Windows Server 2003 R2"
$Picture12.Cells('Char.Size').Formula = '7 pt'# Step 39.
# Draw Line communication from Library to Win-RM
# Set Arrow
$Line18 = $Page.DrawLine(9.1901, 4.3611, 9.6016, 4.3611)
$Line18.Cells('LineColor').Formula = '=RGB(255,255,255)'
$Line18.Cells('BeginArrow').Formula=4
$Line18.Cells('EndArrow').Formula=4Результат виконання попередніх кроків виглядає так:
Взаємодія між Хостами віртуалізації, Бібліотекою і процесами міграції сервісів з фізичного середовища у віртуальне: P2V Source здійснюється за допомогою технології Background Intelligent Transfer Service (BITS). Відобразимо цю двосторонню взаємодію між кінцевими елементами архітектури.
# Step 40.
# Draw BITS Rectangle, Set Size, Set Colour
# Set Text, Align
# Draw Line
$Shape15 = $Page.Drop($Rectangle, 10.9844, 8.2292)
$Shape15.Cells('Width').Formula = '2.75'
$Shape15.Cells('Height').Formula = '0.5625'
$Shape15.Cells('FillForegnd').Formula = '=RGB(255,255,0)'
$Shape15.Cells('LinePattern').Formula = 1
$Shape15.Text = "BITS"
$Shape15.Cells('Para.HorzAlign') = 0
$Shape15.Cells('Char.Size').Formula = '14 pt'
# Step 41.
# Draw BITS Icon
# Set Position, Size
# Set Text
$Picture13 = $Page.Import("c:\!\BITS.jpg")
$Picture13.Cells('Width').Formula = '0.5417'
$Picture13.Cells('Height').Formula = '0.5417'
$Picture13.Cells('PinX').Formula = '10.974'
$Picture13.Cells('PinY').Formula = '8.2344'# Step 42.
# Draw Line communication from BITS to P2V Source
# Set Arrow
$Line19 = $Page.DrawLine(10.9844, 8.5104, 10.9844, 8.75)
$Line19.Cells('LineColor').Formula = '=RGB(255,255,255)'
$Line19.Cells('BeginArrow').Formula=4
$Line19.Cells('EndArrow').Formula=4# Step 43.
# Draw Line communication from BITS to Host
# Set Arrow
$Line20 = $Page.DrawLine(10.9844, 7.6849, 10.9844, 7.9219)
$Line20.Cells('LineColor').Formula = '=RGB(255,255,255)'
$Line20.Cells('BeginArrow').Formula=4
$Line20.Cells('EndArrow').Formula=4# Step 44.
# Draw BITS Rectangle, Set Size, Set Colour
# Set Text, Align
# Draw Line
$Shape16 = $Page.Drop($Rectangle, 10.9844, 5.6555)
$Shape16.Cells('Width').Formula = '2.75'
$Shape16.Cells('Height').Formula = '0.5625'
$Shape16.Cells('FillForegnd').Formula = '=RGB(255,255,0)'
$Shape16.Cells('LinePattern').Formula = 1
$Shape16.Text = "BITS"
$Shape16.Cells('Para.HorzAlign') = 0
$Shape16.Cells('Char.Size').Formula = '14 pt'# Step 45.
# Draw BITS Icon
# Set Position, Size
# Set Text
$Picture14 = $Page.Import("c:\!\BITS.jpg")
$Picture14.Cells('Width').Formula = '0.5417'
$Picture14.Cells('Height').Formula = '0.5417'
$Picture14.Cells('PinX').Formula = '10.974'
$Picture14.Cells('PinY').Formula = '5.6607'# Step 46.
# Draw Line communication from BITS to Host
# Set Arrow
$Line21 = $Page.DrawLine(10.9844, 5.9245, 10.9844, 6.1901)
$Line21.Cells('LineColor').Formula = '=RGB(255,255,255)'
$Line21.Cells('BeginArrow').Formula=4
$Line21.Cells('EndArrow').Formula=4# Step 47.
# Draw Line communication from BITS to Library
# Set Arrow
$Line22 = $Page.DrawLine(10.9792, 5.1042, 10.9792, 5.375)
$Line22.Cells('LineColor').Formula = '=RGB(255,255,255)'
$Line22.Cells('BeginArrow').Formula=4
$Line22.Cells('EndArrow').Formula=4І наостанок виконаємо зміну розміру сторінки згідно розмірів нашої діаграми, збережемо її у вигляді файлу на диску і здійснимо закриття додатку Visio.
# Step 48.
# Resise Page To Fit Contents
$Page.ResizeToFitContents()
# Step 49.
# Save Document
# And Quit Application
$Document.SaveAs(“C:\!\MsSCVMM2007Arch.vsd”)
$Application.Quit()Кінцевий результат схеми показаний на малюнку.
Поточна версія вищезазначеного коду знаходиться в репозиторії Git за цим посиланням: VisioPowershellv01.ps1.
Короткий Підсумок і Наступні кроки
Отже фінальний результат повністю задовільняє наші очікування. За допомогою Powershell Коду була створена схема архітектури системи Microsoft System Center Virtual Machine Manager 2007.
Проте даний підхід має суттєві недоліки.
Загальний об’єм цього коду нараховує понад 500 рядків. Тому тема наступної публікації це оптимізація цього коду за допомогою функцій Powershell.
Але про це вже в наступній публікації.
До зустрічі, за кілька днів.
З повагою AIRRA!


